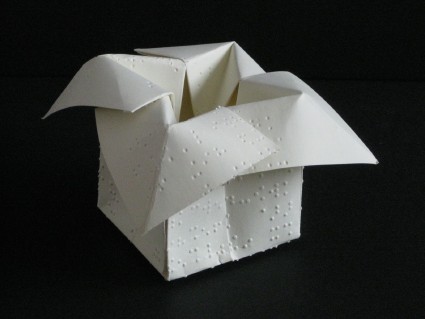

Flower Vase 2
Flower Vase 2
Welcome page
Back to the list

|

Flower Vase 2 |
|
Folding sheets Flower Vase 2 Welcome page Back to the list |
Aveuglami project - folding sheet
Flowers Vase 2
| Author | Forcher Peterpaul |
| Category | vase |
| Difficulty | ** |
| Format | square |
| Base | waterbomb |
| Text | Pretty model of vase, lending itself particularly well to folding from various and varied polygonal shapes.
1. Prepare a waterbomb base. Hold it horizontally, closed tip upwards. The base of the waterbomb has a triangular shape. A vertical valley fold connects the closed point to the middle of the base of the triangle. 2. Bring, through a vertical valley fold, the lower right point of the upper right flap to the midpoint of the base of the triangle. The initial triangular flap is transformed into a small triangular flap carried by a 4-sided flap (one side of the quadrilateral is formed by the vertical valley fold passing through the closed point). The base of the small triangular flap that we form must be perfectly aligned with the base of the original triangle. A vertical hinge fold, located on the right of the small triangular flap, connects it to the 4-sided flap. 3. Bring the vertical hinge fold to the left, rotating from right to left around the vertical valley fold passing through the closed point. The small triangle is now hidden under the 4-sided flap. 4. Bring, through a vertical valley fold, the hinge fold onto the vertical valley fold passing through the closed point. Attention ! you should not fold the little triangle hidden behind the flap that you fold in half, but let it come back on top. The initial triangular flap now forms a sort of fold ending in a sharp point which protrudes on the right side. The root of the tip is on the outside of the fold. 5. Using the folds formed by creating the fold, make two reverse folds so that the start of the point is inside the flap. We perform a first reversal using the folds located furthest from the tip, then a second reversal using the folds closest to the tip. 6. Repeat from step 2 to step 5 on each of the other three triangular flaps of the water bomb base. If we hold the closed tip upwards, the bottom of the final shape is decorated with four points which seem to come out of a sort of tube with vertical edges. Starting from the closed tip, we find the junction points of this tube with the triangle of the closed tip. 7. Fold, using a valley fold passing through two junction points, the closed point towards you. Unfold, fold in mountain on the same fold then return to the original position. Preparation fold for the future background. 8. Turn the fold to put it closed point down. At the top of the fold we find, on each side, a sharp point which protrudes. In the center, there is a double-thick flap forming a rectangle, marked by a vertical valley fold in the middle. 9. Bring, using an oblique valley fold from right to left, the upper right part of the central flap onto the vertical valley fold. Mark well. Unfold. 10. Bring, using an oblique valley fold from left to right, the upper left part of the central flap onto the vertical valley fold. Mark well. Unfold. 11. Using the oblique folds just made, bring the upper midpoint of the rectangle as low as possible onto the vertical valley fold. To perform this movement, simply pull the upper midpoint of the rectangle slightly downwards and, when lowering, push on the oblique folds. We obtain a point directed towards the bottom of the fold. 12. Repeat from step 9 to step 11 on each of the other three central rectangles. The final form has four points, each formed by two 4-sided flaps linked by an oblique hinge fold. We will focus on the two small horizontal lower sides of each point. 13. Fold each short lower side of one of the four points into a valley. Mark strongly. Unfold. You have to proceed from one side, then the other, because the folding is not flat. 14. Flip the tip so that the top sides become bottom sides. Folding becomes three-dimensional. Above all, do not try to flatten completely. 15. Start again from step 13 to step 14 on each of the other three central points. 16. Open the vase by pressing the closed tip so that the flat square bottom is formed. |
| Contents | File |
| Flowers Vase 2 - PDF file | ML-Vase04Ang.pdf |