
Flower Vase 1
Flower Vase 1
Welcome page
Back to the list

|

Flower Vase 1 |
|
Folding sheets Flower Vase 1 Welcome page Back to the list |
Aveuglami project - folding sheet
Flower Vase 1
| Author | Noboru Miyajima |
| Category | vase |
| Difficulty | ** |
| Format | square |
| Base | bird |
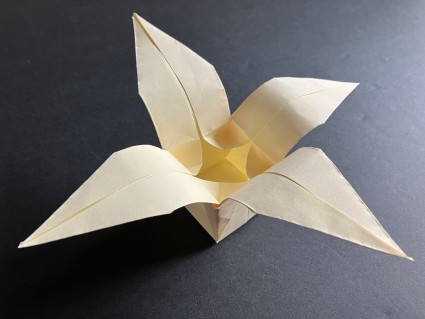
| Text | Very pretty model of vase with four very decorative wings.
1. Prepare a bird base. Hold it with all flaps down. The closed tip is visible, and is at the top. 2. Fold the two outer flaps upwards several times, so as to clearly mark the fold that forms when folded. This valley fold runs between the left and right intermediate vertices located between the closed tip and the bottom of the fold. Locate the midpoint of this fold, located at the intersection with the fold which joins the upper vertex to the lower vertex. 3. Bring, by a vertical valley fold from right to left, the right intermediate vertex of the upper right flap to the midpoint of the fold joining the two intermediate vertices. Mark well. We obtain a triangle whose upper vertex starts from the right intermediate vertex. A short side joins this upper vertex to the vertex which is on the midpoint. A long vertical side joins the upper vertex to the lower vertex. 4. Bring, using an oblique valley fold from left to right, the short side of the triangle that has just been formed on the right vertical edge of the same triangle. Mark well. Repeat this fold backwards and forwards several times. Leave the small triangle in the folded position. The right flap now has a long triangle with a vertical side, a triangle itself carrying a small triangular flap at the top. 5. Unfold the small flap and place the supporting triangle vertically. This triangle has, at the front, a pocket which, in its upper part, hides extra thickness. 6. Carefully flatten the flap. You must help the triangle to flatten because the extra thickness hidden inside tends to prevent the operation from being done correctly. This is the most difficult step in folding. We then obtain a sort of kite, one half of which extends outside the general shape of the fold. 7. Fold, using a mountain fold from front to back, the overhanging part to hide it behind the flap. In the end, the initial flap now has two small triangles located on either side of its right edge. 8. Repeat the operations from step 3 to step 7 by applying them to the other three flaps of the base of the bird. We obtain a 6-sided shape, with a large point closed on one side, four flaps each carrying two small triangles on either side of their thickness and forming a sharp elongated point. 9. Make a fold several times in the valley then in the mountains joining the two intermediate summits located near the closed point. Preparing the background. 10. Fold all the flaps down using a valley fold passing through the intermediate peaks located towards the thin points, then allow them to rise up. 11. Carefully open the vase, pressing lightly on the closed tip and gradually spreading the wings by passing a finger inside. You must open carefully because, inside the vase, folds form between two adjacent wings, folds which tend to close the opening and tear if you use too much force. 12. If you want to enlarge the opening, you must delicately pass a finger under each fold so as to fold it upwards to make it fit the shape of the vase. The fold will not exactly fit the walls of the vase. Be careful not to tear them. 13. Shape the bottom and sides by gently pinching them. Optionally hem the wings to give movement. And here is a pretty vase for a flower like the hibiscus in crumpled paper, or which transforms into a welcoming box for candies and chocolates. |
| Contents | File |
| Flowers Vase 1 - PDF file | ML-Vase02Ang.pdf |