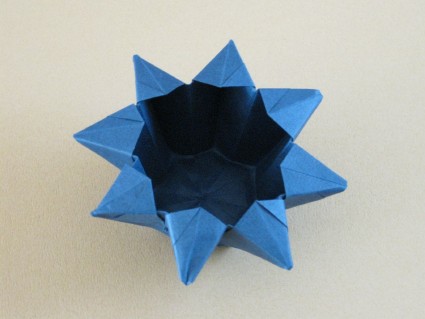

The Flower Pot
The Flower Pot
Welcome page
Back to the list

|

The Flower Pot |
|
Folding sheets The Flower Pot Welcome page Back to the list |
Aveuglami project - folding sheet
The Flower Pot
| Author | Temko Florence |
| Category | vase |
| Difficulty | ** |
| Format | square |
| Base | preliminary |
| Text | A pretty vase, with a very interesting variation.
1. Prepare a preliminary base, hold it with the closed tip upwards. 2. Flatten each of the four flaps extending from the closed tip, starting with the closed tip. This is the start of the frog's base. We obtain a four-sided shape with a closed point at the top and sharp points at the bottom which meet on the median vertical fold. 3. Turn the upper right flap to the left, using the middle vertical crease. The bottom of the fold now has a smooth triangular point. 4. Flip the fold from right to left. 5. Turn the upper right flap to the left, using the middle vertical crease. We now have a balanced folding which has, towards the bottom, at the front and at the back, a triangular point of simple thickness. 6. Fold the lower triangular point inwards, using a mountain fold passing through the left and right middle vertices. You can also make a preparation fold in the valley, then return this fold in the mountains. The folding is more precise. 7. Fold the other three points inwards, following the model of step 6. To do this, you will have to turn the flaps to be able to reach the flaps enclosed in the two front and rear flaps. We obtain an elongated triangular shape, large point upwards. Check that the eight triangular flaps are well distributed, 4 on the left and 4 on the right. 8. Fold the bottom right apex of the top right flap over the vertical midfold, using a valley fold starting at the bottom midpoint of the triangular shape. Mark the fold well. Be careful not to go beyond this point and to stay well along the central axis. 9. Fold the lower left vertex of the upper left flap over the vertical midfold, using a valley fold starting at the bottom midpoint of the triangular shape. Mark the fold well. Be careful not to go beyond this point and to stay well along the central axis. 10. Flip the fold from right to left. 11. Repeat steps 8 and 9 on the upper right and left triangular flaps. 12. Open the folding to repeat steps 8 and 9 on the interior flaps. We now obtain a 4-sided shape. 13. Unfold all the flaps folded in steps 8 and 9 downwards. These were actually preparations for the steps that follow. 14. Spread the flaps slightly as if to make an umbrella. There are now 8 mountain folds extending from the closed point. At the base of these mountain folds we find the folds which were made in steps 8 and 9. 15. Select one of the 8 mountain folds. 16. Using the folds at its base, make an external reverse fold. Flatten well around the original mountain fold. Simply gently turn over the point at which the mountain fold is being processed. 17. Repeat step 16 on each of the other 7 mountain folds. We find a shape with 4 sides. Check that the 8 flaps are well distributed, that the closed point is at the top and that at the bottom there is a large smooth point. 18. Raise the bottom point as high as possible, using a valley fold passing through the two middle peaks of the general shape. Do not exceed the limit of the two corners otherwise the paper will be torn. We obtain a small triangular flap facing upwards, which surmounts two small points facing downwards, separated by a vertical slit. 19. Rotate the upper right flap from right to left around the central vertical axis. We find a smooth triangular point at the bottom. 20. Without turning the folding, turn the left rear flap to rebalance the folding. We try to always have 4 flaps on one side and 4 flaps on the other. 21. Repeat steps 18 to 20 until all the large points have been raised inside the fold. We again have a triangular shape. Check that it is closed with its tip upwards. There is, at the bottom of the fold, a small triangular flap facing upwards. 22. Bring, using a valley fold, the top of the closed point to the top of the small triangle facing upwards. Mark in one direction and the other. This is a preparation fold to form the bottom of the vase. Do this with caution because there are many layers. You can vary your position to have different depths. 23. Carefully insert a finger inside the fold, so as to help form the bottom. 24. Completely open the bottom using the fold made in step 22. The background will be octagonal. 25. Pass a finger inside each point bordering the vase, to ensure that they are properly open. This is a pretty octagonal vase with slightly curved edges, but very pretty. It is perfectly suited to accommodate a cactus. Variation 1. Instead of folding 8 points following steps 18 to 20, we only fold four of them, distributed symmetrically. |
| Contents | File |
| The Flower Pot - PDF file | ML-Vase01Ang.pdf |