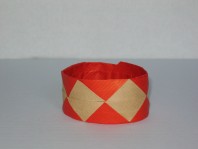

Bracelet
Bracelet
Welcome page
Back to the list

|

Bracelet |
|
Folding sheets Bracelet Welcome page Back to the list |
Aveuglami project - folding sheet
Bracelet
| Author | Beech Rick |
| Category | item |
| Difficulty | * |
| Format | square, two-tone |
| Base | box-pleating |
| Text | This folding uses the box-pleating folding technique parallel to the diagonals. Depending on the size of the starting sheet, you obtain a bracelet, a napkin ring or... a ring.
1. Hold the sheet in the tip up position. 2. Form a valley fold along the horizontal diagonal, bringing the top vertex over the bottom vertex. Mark the fold. We have a triangular shape composed of two triangular flaps linked by a horizontal upper hinge fold. Find the midpoint 3. Form a valley fold by bringing, from right to left, the right tip over the left tip, without marking the fold. Pinch in the middle. Unfold. Prepare the accordion 4. Form a valley fold by bringing the lower point of the front flap to the midpoint marked in step 3. The triangular flap is transformed into a trapezoid with a horizontal lower hinge edge, which links with a front triangular flap that points upwards. 5. Form a valley fold by bringing, from bottom to top, the lower edge of the trapezoid on the upper hinge fold, folding through both layers. Mark the fold. You have to be careful with the front triangular flap, which tends to slide out of the fold. The upper flap now has a very elongated trapezoid shape. 6. Form a valley fold by bringing, from bottom to top, the lower edge of the trapezoid on the upper hinge fold, folding through all layers. Mark the fold. All layers must be monitored so that they do not slip on top of each other. 7. Unfold the assembly so as to return to the front triangle of step 2. 8. Flip the fold from right to left. 9. Repeat the preparation operations from step 4 to step 7 inclusive. We again have a triangular shape composed of two flaps linked by a horizontal upper hinge fold. The flaps are marked by equidistant horizontal folds. 10. Form a valley fold by bringing the front flap up using the first fold located below the top hinge fold. 11. Form a valley fold by bringing the front flap down using the fold located directly above the upper hinge fold. 12. Repeat successive folds downwards then upwards, as indicated in step 10 followed by step 11. The process ends with a small triangle with its tip facing upwards. 13. Flip the fold from right to left. 14. Repeat the treatments from step 10 to step 12 by applying them to the front flap. We obtain a very elongated trapezoid supporting at the front and rear a series of increasingly smaller flaps, the last being simple small triangles. There is a central hinge fold, which corresponds to the hinge fold at the start of the folding. 15. Open the fold using the central hinge fold. We obtain a strip, formed of a horizontal upper side and a lower side linked by a triangular point on the left and right. The back of the folding is a smooth shape. The front of the folding carries the different flaps of decreasing length. 16. Form a circle with the strip, bringing the right tip over the left tip. 17. Slide the right tip inside the left tip, about 1 or 2 cm. There is no reference point. This operation depends on the strength of the bracelet, which is now finished and ready to wear. Two-tone paper allows you to obtain a succession of squares and triangles of different colors. You just have to hope that you chose the right size for the starting sheet! |
| Contents | File |
| Bracelet - PDF file | ML-Item01Ang.pdf |