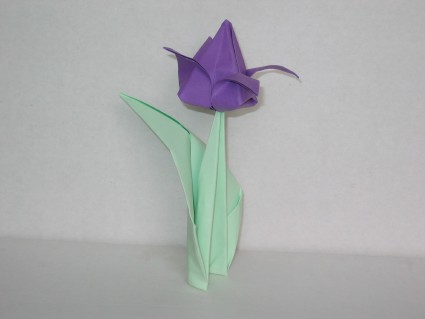

Tulip
Tulip
Welcome page
Back to the list

|

Tulip |
|
Folding sheets Tulip Welcome page Back to the list |
Aveuglami project - folding sheet
Tulip
| Author | Traditional |
| Category | flower |
| Difficulty | ** |
| Format | square |
| Base | waterbomb |
| Text | This folding of flowers has various names, depending on the imagination of the folder. The two most common are tulip or lotus bud.
Flower 1. Start by making a base for the water bomb. Hold the triangular shape with the closed tip at the top, the base horizontal. 2. Form a valley fold by bringing the lower right vertex of the right front flap over the vertex of the triangle. Mark the fold well. 3. Form a valley fold by bringing the lower left vertex of the left front flap over the vertex of the triangle. Mark the fold well 4.Flip the fold from right to left. 5. Form a valley fold by bringing the lower right vertex of the right front flap over the vertex of the triangle. Mark the fold well 6. Form a valley fold by bringing the lower left vertex of the left front flap over the vertex of the triangle. Mark the fold clearly. We now have a square shape arranged in a diamond shape. There are two symmetrical front flaps, triangular in shape, attached to the whole form by lower left and right hinge folds. The two front flaps hide a square shape which, in turn, hides two rear flaps similar to the front flaps. The lower point is closed, while the upper point is made up of two free points which hide a closed point, which itself hides two free points. 7. Rotate the left front flap from left to right onto the right front flap. 8. Flip the fold from right to left. 9. Rotate the left front flap from left to right on the right front flap. We again have a square shape, but the triangular flaps are no longer visible. A vertical valley fold joins the upper point to the lower point. We will call it: axis. 10. Form an oblique valley fold by bringing, from right to left, the middle vertex of the right front flap a little to the left of the axis. The crease starts at the top of the shape. The side that is moved will cut the axis. The new triangular flap that we have just formed contains a pocket which will be used for the next step. 11. Form an oblique valley fold by bringing, from left to right, the middle vertex of the left front flap a little to the right of the axis. The crease starts at the top of the shape. The side that is moved must intersect the axis at the same place as the previous flap, so as to be symmetrical. 12. Slide the lower right top of the new flap (left front) into the pocket formed by the right front flap. Mark the folds well. 13. Flip the fold from right to left. 14. Form an oblique valley fold by bringing, from right to left, the middle vertex of the right front flap a little to the left of the axis. The crease starts at the top of the shape. -The side that is moved will cut the axis. The new triangular flap that we have just formed contains a pocket which will be used for the next step. 15. Form an oblique valley fold by bringing, from left to right, the middle vertex of the left front flap a little to the right of the axis. The crease starts at the top of the shape. The side that is moved must intersect the axis at the same place as the previous flap, so as to be symmetrical. 16. Slide the lower right top of the new flap (left front) into the pocket formed by the right front flap. Mark the folds clearly. We now have a shape composed of a short, closed point at the bottom, with an obtuse angle and at the top of an elongated point, with an acute angle. 17. Fold the lower point forward in a valley along the imaginary line formed by the left and right middle vertices. Start again in the mountain folds towards the back. 18. Open the shape slightly by pressing on the lower tip (or blowing into it) and helping the joined flaps to move apart. You should not move completely apart at this time. The bottom tends to flatten into a square front. Four edges are drawn, each of which joins a bottom vertex to the upper vertex of the shape. Straddling each of the edges is a triangular flap whose upper point is free. 19. Gently fold each flap backwards, straddling an edge, so as to separate the tip from the edge. Do not go beyond the middle of the edge. This fold allows you to draw petals. Be careful not to tear the paper. You must also check that the interlocking flaps have not separated. 20. Finish flattening the background, and finish shaping. Here is a pretty flower that can be held on a simple stem (for example, [stem and leaf 2] was used for the photo), since the bottom is holed. |
| Contents | File |
| Tulipe (in french) - PDF file | ML-Flower19Ang.pdf |