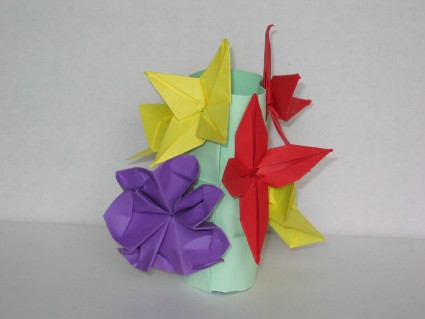

Flower Stand
Flower Stand
Welcome page
Back to the list

|

Flower Stand |
|
Folding sheets Flower Stand Welcome page Back to the list |
Aveuglami project - folding sheet
Flower Stand
| Author | Lucas Michel |
| Category | flower |
| Difficulty | ** |
| Format | any |
| Base | - |
| Text | The flower stand is a simple support that allows you to highlight a set of flowers placed on the support as you wish.
Preparing two flaps 1. Hold the sheet in a horizontal position. 2. Form a valley fold by bringing the upper edge down parallel to itself, to form a horizontal flap approximately 1 cm high. Mark the fold well. Unfold. There is no reference point. The height of 1 cm is purely indicative. 3. Form a valley fold by folding the bottom edge upwards, parallel to itself, to form a horizontal flap approximately 1 cm high. Mark the fold well. Unfold. There is no reference point. The height of 1 cm is purely indicative. Creation of folds 4. Flip the fold from right to left. 5. Form a valley fold by folding the bottom edge upwards, parallel to itself. Mark the fold well. There is no reference point. This first fold should be made towards the top of the sheet. This will be the bottom of the fallback. 6. Form a downward valley fold by folding the upper edge of the front flap parallel to itself, at a distance of approximately 1 cm from the previous fold. Mark the fold well. There is no reference point. The succession of folds 5 and 6 creates a horizontal fold 1 cm high (height which can be modified) across the sheet. It is in such a fold that we will come to attach flowers. 7. Form other folds by repeating step 5 and step 6 on the front flap. The number and locations of successive folds depend only on your imagination and... the size of the paper. Three folds in an A4 format sheet held vertically are sufficient. Formation of the Flower Stand. 8. Bring the right edge over the left edge, without flattening the fold. 9. Form a valley fold by folding, from left to right, the left edge through all the layers, parallel to itself, to form a vertical flap approximately 1 cm wide. Mark the fold well. Unfold. There is no reference point. The width of the flap may be less than 1 cm. 10. Fold the left edge into a valley from left to right using the fold you just made. We reform the flap of step 9, but only on the left side of the fold. 11. Bring the right edge to the bottom of the flap you have just created, without flattening it. 12. Form a valley fold by folding, from left to right, the left edge to form a new flap which traps the old right edge. This fold uses the preparatory fold made in step 9. We now have a tube carrying a certain number of folds. We are going to fold the top and bottom of the tube to block the whole thing. 13. Fold the upper edge of the tube inward using the preparatory fold in step 2. You have to help the paper a little to get into a circular shape. 14. Fold the lower edge of the tube inward using the preparatory fold in step 3. The flower stand is ready. All you have to do is slide flowers with a small stem into the folds, as you wish, such as the single flower, the carnation or the flower with four petals 2. By varying the size of the support, the arrangement of the folds, the flower models, the color of the papers, you can create multiple compositions. |
| Contents | File |
| Flower Stand - PDF file | ML-Flower14Ang.pdf |