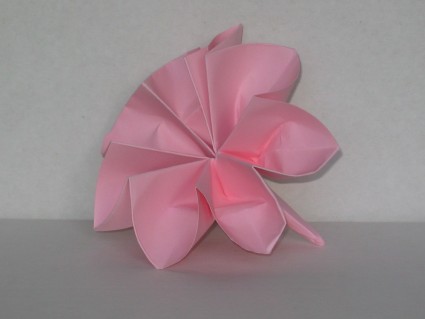

Carnation
Carnation
Welcome page
Back to the list

|

Carnation |
|
Folding sheets Carnation Welcome page Back to the list |
Aveuglami project - folding sheet
Carnation
| Author | Sonobe Mitsunobu |
| Category | flower |
| Difficulty | *** |
| Format | square |
| Base | frog |
| Text | This flower pattern borrows the technique from flower 1, but applies it to a base with
more folds. The final flower is double.
First instar of a frog base 1. Start with the preliminary base, oriented free ends downwards. 2. Create a valley fold by bringing the top right edge of the right front flap over the vertical middle fold. Unfold. 3. Raise the right part of the front flap vertically. Slide a finger inside the triangular pocket to open it. Flatten it using the folds made in the previous step. The flattened flap transforms into a front triangle to which are connected, by two hinged edges, two small triangles (one left and one right) of which part is hidden and part is visible below the lower edge of the front triangle. The whole forms a symmetrical quadrilateral in relation to a vertical median axis, with a long sharp point upwards and a short point downwards. 4. Flip the fold from left to right. 5. Create a valley fold by bringing the top right edge of the right front flap over the vertical middle fold. Unfold. 6. Raise the right part of the front flap vertically. Slide a finger inside the triangular pocket to open it. Flatten it using the folds made in the previous step. 7. Rotate the small left front flap from left to right along the center vertical axis. 8. Rotate the left front flap from left to right along the center vertical axis. 9. Create a valley fold by bringing the upper right edge of the right front flap over the vertical middle fold. Unfold. 10. Raise the right part of the front flap vertically. Slide a finger inside the triangular pocket to open it. Flatten it using the folds made in the previous step. 11. Flip the fold from right to left. 12. Rotate the small left front flap from left to right along the center vertical axis. 13. Rotate the left front flap from left to right along the center vertical axis. 14. Create a valley fold by bringing the upper right edge of the right front flap over the vertical middle fold. Unfold. 15. Raise the right part of the front flap vertically. Slide a finger inside the triangular pocket to open it. Flatten it using the folds made in the previous step. We obtain a diamond shape with a closed point elongated upwards and a shorter point formed by 4 small free points distributed 2 by 2 around the vertical axis. Prepare the petals 16. Rotate the left front flap from left to right along the center vertical axis. 17. Fold the lower tip of the front flap into a valley from bottom to top on the central axis. The fold passes through the two left and right middle points of the front flap. 18. Flip the fold from right to left. 19. Rotate the left front flap from left to right along the center vertical axis. 20. Fold the lower tip of the front flap into a valley from the bottom to the top on the central axis. The fold passes through the two left and right middle points of the front flap. We only see two small points at the bottom. 21. Rotate the small left front flap from left to right along the center vertical axis. 22. Rotate the left front flap from left to right along the center vertical axis. 23. Fold the lower tip of the front flap into a valley from bottom to top on the central axis. The fold passes through the two left and right middle points of the front flap. 24. Flip the fold from right to left. 25. Rotate the small left front flap from left to right along the center vertical axis. 26. Rotate the left front flap from left to right along the center vertical axis. 27. Fold the lower tip of the front flap into a valley from bottom to top on the central axis. The fold passes through the two left and right middle points of the front flap Finish the flower 28. Close the fold by folding the four left flaps together over the four right flaps using the vertical centerline. 29. Rotate the folding 90¡ from left to right. We now have a triangular shape whose upper horizontal edge is made up of hinge folds which link 8 free flaps downwards. To the right there is a fairly sharp point, while to the left there is a short point. 30. Make an internal inverted fold with the right tip. There is no reference point. This fold forms the stem of the flower. On the left are the future petals, enclosed in an outer fold. 31. Turn the upper petal over, which will have the effect of opening the flower. It is necessary to release the future stem of the flower a little to be able to carry out this operation correctly. 32. Shape the petals by slightly breaking the tip of each petal backwards. Here is a pretty flower that can be slipped into [stem and leaf 1]. |
| Contents | File |
| Carnation - PDF file | ML-Flower12Ang.pdf |