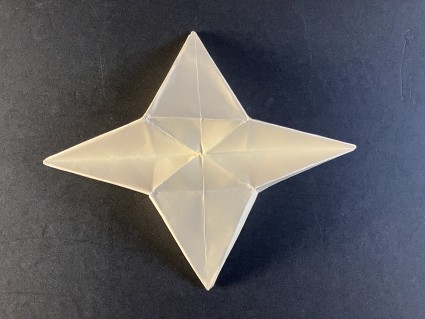

Stretched Star
Stretched Star
Welcome page
Back to the list

|

Stretched Star |
|
Folding sheets Stretched Star Welcome page Back to the list |
Aveuglami project - folding sheet
Stretched Star
| Author | Traditional |
| Category | decoration |
| Difficulty | ** |
| Format | square, two-tone |
| Base | blintz |
| Text | This is an almost magical model. A few folds, a stretch and a four-pointed star appears!
1. Make a blintz base, hold it with the tips folded on top. Transform the blintz base into a preliminary base Hold the blintz base in the horizontal position 2. Fold from top to bottom the upper horizontal edge onto the lower horizontal edge. Unfold. 3. Fold from right to left the right vertical edge onto the left vertical edge. Unfold. 4. Flip the blintz base from right to left. 5. Fold a diagonal, bringing the upper left vertex of the square over the lower right vertex. Mark well. Unfold 6. Fold the other diagonal, bringing the upper right vertex of the square over the lower left vertex. Mark well. Unfold. 7. Using the preparatory folds, transform the blintz base into a preliminary base. The triangles of the blintz base up, pinch at the same time the left and the right sides of the square while pushing so that four points are formed and meet towards the top of the foldYou obtain a square shape made up of 4 triangular flaps of thickness 2. These flaps are connected to each other by hinge folds starting from a closed point. b - Transform the preliminary base into the base of the bird. 1. The fold in a diamond posiiton, the closed point on top, bring, by an oblique fold, the lower right side of the right triangle onto the vertical fold starting from the top. Mark well. leave the fold in place. You will have to fold a flap of thichkness 4. 2. The closed point on top, bring, by an oblique fold, the lower left side of the lesft triangle onto the vertical fold starting from the top. Mark well. Leave the fold in place. Two narrow triangles have been created. Their upper sides draw a horizontal line. 3. Using the horizontal sides of the former flaps, create a horizontal fold along this line by drawing towards you the closed tip. Mark well. Reverse this fold a few times. Unfold this fold and the 2 former ones, in order to see again the square shape of [step 8]. 4. Flip the fold from right do left. The closed tip remains on top of the fold. 5. Repeat [step b-1] and [step b-2] ont the two upper triangular flaps. Mark well the folds. Unfold them. 6. Take the lower tip and, using the horizontal fold made in [step b-3] , pull it as much as possible towards the top of the shape. An elongated diamond appears, with very pointed ends and a vertical slit in the middle. 7. Flip the fold from laft to right. 8. Apply the technique of [step 6] to the upper square. As a result, you have an elongated diamond shape. At the bottom, you find two acute points of thickness 4, separated by a slit. On top, you find two triangular flaps of thickness 2, resembling two triangular wings, with a slit in the middle of each of them. Enclosed between these two wings, you find a small triangular point. c - A star will born 1. Holding the fold vertically, with the small hidden triangular tip facing up, place the triangular wings horizontally, one towards you, the other going in the opposite direction. 2. Take the left lower tip between the thumb and index finger of the left hand and the right lower tip between the thumb and index finger of the right hand. 3. Gently spread the two inner tips by pulling them horizontally and upwards, until the creases in the center disappear with a small noise. it's done! The result is obtained easily if you can push down the center of the fold. |
| Contents | File |
| Stretched Star - PDF file | ML-Decoration08Ang.pdf |