
Star A4
Star A4
Welcome page
Back to the list

|

Star A4 |
|
Folding sheets Star A4 Welcome page Back to the list |
Aveuglami project - folding sheet
Star A4
| Author | Robinson Nick |
| Category | decoration |
| Difficulty | * |
| Format | A4 rectangle |
| Base | - |
| Text | This is a nice folding, which starts by obtaining a 30¡ angle. This little difficulty overcome, the rest is quite easy, the result pleasant.
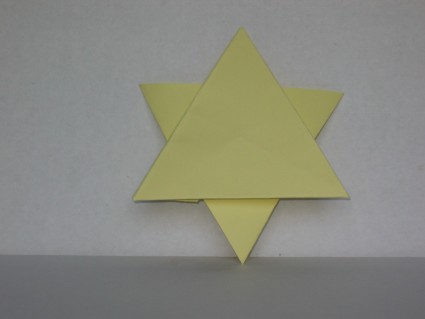
1. Take a rectangular sheet (e.g. A4) held in a vertical position. 2. Bring, using a valley fold from left to right, the right edge to the left edge. Unfold. 3. Bring the bottom right corner to the middle crease you just created. The fold starts from the lower left corner This fold is quite difficult to make. You must start by bringing the lower right corner to the middle fold, without marking the fold. We then prepare the start of the fold in the lower left corner, by pinching it very lightly. You must then adjust the position of the corner on the central fold until you obtain a very clear straight line segment. We obtain a quadrilateral (rectangular trapezoid) which carries a triangular flap linked by an oblique hinge fold. 4. Bring, through an oblique valley fold resting on the upper right edge of the triangular flap (smaller side), the upper right corner on the hinge fold. The right side of the rectangular trapezoid aligns with the lower hinge fold of the fold in step 3. 2. We obtain an outline of a triangle whose left side is hidden at the top by part of the flap that we have just folded. 5. Fold back the part of the upper flap which protrudes, resting on the left side of the triangle. The triangular shape appears completely. 6. Bring the small triangular flap that you have just folded under the upper flap. 7. Flip the fold from right to left. We obtain an equilateral triangle whose surface is entirely smooth. 8. Rotate the fold so that the top edge of the triangle is horizontal. 9. Bring, by a valley fold from top to bottom towards the left, the upper edge of the triangle on its left edge. Mark, unfold. 10. Bring, by a valley fold from top to bottom to the right, the upper edge of the triangle on its right edge. Mark, unfold. 11. Bring, using a valley fold from right to left, the right edge of the triangle to its left edge. Mark, unfold. We constructed the bisectors of the three angles. They intersect at the center of the triangle. 12. Bring, by a valley fold from left to right, the upper left vertex to the center of the triangle. Mark well. 13. Bring, by a valley fold from right to left, the upper right vertex to the center of the triangle. Mark well. 14. Bring, by a valley fold from bottom to top, the lower vertex to the center of the triangle. Mark well. We obtain a hexagon with three triangular flaps. 15. Flip the fold from right to left. We can recognize on this face of the hexagon three folds which intersect in the center and a fourth valley fold perpendicular to one of the three concurrent folds. At the rear are the three triangular flaps. 16. Flip one of the three rear triangular flaps from the back to the front by making a valley fold using the fold perpendicular to one of the three folds passing through the center. Mark well. The fold applies to the front hexagonal face, but respects the rear triangular flap. This becomes a front flap, the tip of which protrudes from the hinge edge created by the fold that has just been made and the base of which passes through the center of the fold. Below the triangle is a trapezoid whose parallel edges are formed by the hinge fold which forms the edge of the figure and the hinge fold which forms the base of the front triangular flap. The other two sides of the trapezoid are on either side of the front triangular flap. 17. Switch another rear triangular flap from the back to the front by making a valley fold resting on one of the two short sides of the trapezoid hidden under the front triangular flap. Mark well. 18. Tilt the last rear triangular flap from back to front by making a valley fold resting on the second short side of the trapezoid hidden under the first front triangular flap. Mark well. In practice, this last fold also rests on a small side of the trapezoid hidden under the second front triangular flap. The two short sides are aligned. 19. Slide one of the two vertices of the base of the last triangular flap under the trapezium of the first front triangular flap, so that all the trapezoids form a self-locking cycle. 20. Flip the fold from right to left. This is a beautiful six-pointed star, also known as the Star of David. |
| Contents | File |
| Star A4 - PDF file | ML-Decoration07Ang.pdf |