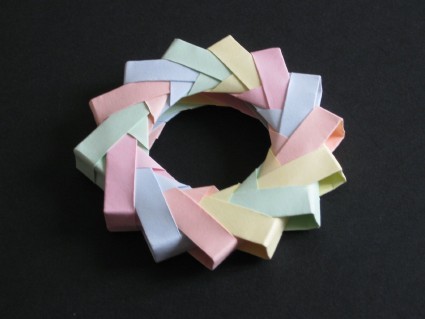

Modular Ring
Modular Ring
Welcome page
Back to the list

|

Modular Ring |
|
Foding sheets Modular Ring Welcome page Back to the list |
Aveuglami project - folding sheet
Modular Ring
| Author | Afonkina Sandra |
| Category | decoration |
| Difficulty; | ** |
| Format | square |
| Base | modular |
| Text | A spectacular fold that requires a lot of concentration, this ring, whether multi-colored or not, will have a great effect.
Elementary module You will need to create 14 modules to obtain the complete shape. The folds must be very precise. 1. Take a square sheet, hold it in a horizontal position. 2. Fold the sheet in half using a valley fold from bottom to top on the horizontal median. We assume that the hinge fold is at the bottom. 3. Bring, using an oblique valley fold from left to right, the upper left corner along the hinge fold. 4. Bring, using an oblique valley fold from right to left, the upper right corner along the hinge fold. We now have a triangular upper flap, pointing upwards, carrying two other triangular flaps, all hiding a rectangular rear flap linked by the hinge fold. 5. Bring the rectangular flap forward by rotating it around the hinge fold. This amounts to transforming the mountain hinge fold into a valley fold. The triangular flap is now hidden. 6. Bring, using a valley fold from top to bottom, the upper edge of the front rectangular flap on the hinge fold. The original rectangular flap is now folded in half, with a hinge fold at the top. We can now see the upper part of the triangular flap. The base of the triangular flap is hidden by the rectangular flap. 7. Bring, by a downward movement, the hinge fold to the imaginary line which forms the base of the triangular flap. Mark the valley fold which forms behind the front rectangular flap, without folding it. We obtain a triangular shape bordered, towards the bottom, by an accordion formed by a first rectangular flap hiding two other half-sized flaps. The triangular part has two flaps which meet on a vertical line. 8. Bring the upper rectangular flap upwards, rotating around the upper hinge fold. Part of the tip is now hidden. The bottom of the fold has a rectangular flap of double thickness whose upper edge is drawn by a fold marked at the bottom of the triangular point. 9. Flip the fold from right to left. The triangular part must be smooth. On each side of the point protrudes a small triangular flap. 10. Fold, using a valley fold from left to right resting on the left side of the triangular point, the triangular flap which protrudes on the left of the fold. Mark the fold well. 11. Fold, using a valley fold from right to left resting on the right side of the triangular point, the triangular flap which protrudes on the right of the fold. Mark the fold well. 12. Fold, using a movement from the bottom to the top, the lower rectangular flap by rotating around the fold located at the base of the triangular point. The two folded triangular flaps are now trapped behind the flap that has just been reassembled. 13. Flip the fold from right to left. The triangular tip, the upper part of which has a vertical slot, now hides the rectangular flap which protrudes from both sides of the tip, towards the bottom. 14. Bring, by a valley fold from left to right, the upper left side of the rear rectangular flap to the point formed by the intersection of the right side of the triangular point and the upper edge of the rectangular flap which protrudes on the right . Mark the fold well. Unfold. The junction point is easy to locate, by running your finger from top to bottom along the right edge of the tip of the triangular flap. The bottom of the part that is folded must remain aligned with the bottom of the triangular flap. Carefully monitor the lower part of the crease that forms, as the thickness of the paper in this area can lead to unwanted creases. 15. Bring, by a valley fold from right to left, the upper right side of the rear rectangular flap to the point formed by the intersection of the left side of the triangular point and the upper edge of the rectangular flap which protrudes on the left. Mark the fold well. Unfold. The junction point is easy to locate, by running your finger from top to bottom along the left edge of the tip of the triangular flap. The bottom of the part that is folded must remain aligned with the bottom of the triangular flap. Carefully monitor the lower part of the crease that forms, as the thickness of the paper in this area can lead to unwanted creases. 16. Present the module by bending the two sides you have just created at right angles. The module is finished. It looks like a kind of U, formed by a pentagonal face composed of a rectangular part ending in a point, and two symmetrical wings. Each wing, triangular in shape, is bordered by a rectangular flap which protrudes at the bottom, towards the rear of the module, creating two points at right angles. Each rectangular flap hides part of the triangular flap folded at [step 10] or [step 11]. The entire bottom of the rectangular flap and the captive triangle form a pocket into which the tips of a wing of another module will slide. Assembly Quite simple, it consists of hanging the 14 rings together by sliding some points into the pockets. Good luck! |
| Contents | File |
| PDF format - | ML-Decoration01Ang.pdf |