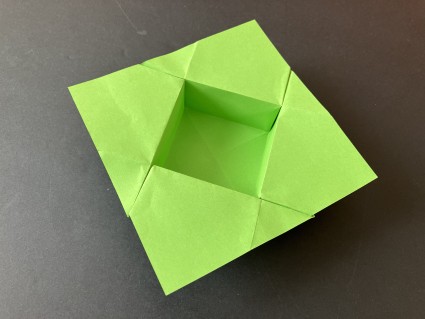

Serving Dish
Serving Dish
Welcome page
Back to the list

|

Serving Dish |
|
Folding sheets Serving Dish Welcome page Back to the list |
Aveuglami project - folding sheet
Serving Dish
| Author | Boursin Didier |
| Category | box |
| Difficulty | ** |
| Format | square |
| Base | blintz |
| Text | This serving dish is very simple and very elegant. It requires a little help, but is quickly acquired.
1. Take a square sheet in a horizontal position. Create a valley fold by bringing the top edge over the bottom edge from top to bottom. Mark well. Unfold. You have marked the horizontal median 2. Create a valley fold by bringing the right edge over the left edge from right to left. Mark well. Unfold. You have marked the vertical median. The two medians intersect in the middle of the sheet 3. Using the middle of the sheet, make a blintz base by bringing, using oblique valley folds, the four vertices to the middle of the sheet. Hold the fold in a horizontal position, with the free flaps upwards. 3. Flip the fold from right to left. You have a square whose edges are formed by hinge folds attaching triangular flaps. 4. Create a valley fold by bringing from top to bottom the top edge over the horizontal median. When making this fold, let the rear flap come back towards you, so as not to fold it. Mark well. 5. Create a valley fold by bringing from bottom to top the bottom edge over the horizontal median. When making this fold, let the rear flap come back towards you, so as not to fold it. Mark well. 6. Come back to the state of [step 2] by unfolding both folds and putting back under the fold the triangular flaps. 7. Create a valley fold by bringing from right to left the right edge over the vertical median. When making this fold, let the rear flap come back towards you, so as not to fold it. Mark well. 8. Create a valley fold by bringing from left to right the left edge over the vertical median. When making this fold, let the rear flap come back towards you, so as not to fold it. Mark well. 9. Come back to the state of [step 2] by unfolding both folds and putting back the triangular flaps under the fold . There are now 4 lines intersecting two by two. Four small squares are demarcated in the four corners of the fold 10. Bring the upper left corner to the lower right corner, but only mark well by pinching the folds in the upper left and lower right small squares. Return to the starting situation. You have created diagonals in the small squares, without marking the center of the sheet. 11. Bring the upper right corner to the lower left corner, but only mark well by pinching the folds in the upper left and lower right small squares. Return to the starting situation. You have created diagonals in the small squares, without marking the center of the sheet. 12. Flip the fold from right to left. Unfold everything. Hold the sheet in the horizontal position. In the middle, you can feel a square whose edges are delimited by mountain folds. Starting from every corner of the square, you can feel horizontal and vertical folds going to the sides of the sheet. The valley folds arriving on the left and the right of the intersection points have been made when making the blintz base. Four small triangles are delimited in the four corners. 13. Looking at the top horizontal side of the sheet, put the left small triangle in the left upper corner to the sheet. One side of the triangle is a hinge fold. A second side is horizontal, starting from the left side of the sheet. The third side is vertical, starting from the upper side of the sheet. 14. Bring the left side of the sheet against the vertical side of the triangle. Do not flat all the sheet, but mark well only starting from the top of the sheet until you meet the intersection with two former folds. Mark well. You can feel a thickness 2 rectangle triangle which you can fold and unfold several times. 15. Unfold everything. 16. Rotate the sheet 90 degrees, and repeat the operations from [step 13] to [step 15]. 17. Repat [step 16] twice more. All preparatory folds have been made. We are going to put the fold into 3D 18. Pushing on the four sides starting from the central square delimited by valley folds, let the walls become vertical. Let the great triangles become horizontal ones. The inside of a box begins to appear. In each corner, a triangle of thickness 2 appears above and to the left of a kind of valley joining two edges of the box. 19. Pinch the triangle and put its top into the valley, as far as possible. The main triangles become horizontal. This is a difficut step to achieve. Be patient! 29. Apply the operations of [step 19] three times, so that the four initial triangles form a beautiful horizontal border to the open box. This serving dish has a great capacity. Very useful for aperitifs! |
| Contents | File |
| Serving Dish - PDF file | ML-Box14Ang.pdf |