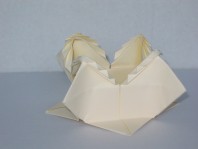

Spanish Box
Spanish Box
Welcome page
Back to the list

|

Spanish Box |
|
Folding sheets Spanish Box Welcome page Back to the list |
Aveuglami project - folding sheet
Spanish Box
| Author | Traditional |
| Category | box |
| Difficulty | ** |
| Format | square, two-tone |
| Base | modular |
| Source | Editions de l\'Homme |
| Text | Here is a box adorned with the frills of a flamenco dancer. It's cute !
1. Make a blintz base. 2. Flip the fold from right to left. 3. Bring the four corners of the lined base toward the center, forming valley folds. We obtain a new square half of the previous one, with the edges at 45¡ to the horizontal. There is a trapped rear square flap and four free triangular front flaps, each with a hinge fold along the edges of the new square and joining the other triangles in the center of the figure. 4. Form a valley fold by bringing the tip of one of the triangular flaps to the middle of the corresponding hinge fold. 5. Repeat step 4 with the other three triangles. We thus obtain four triangular flaps whose points are oriented towards the outside of the square of the previous step. These flaps will form the feet of the final box. 6. Flip the fold from right to left. We are on the side on which there are four single-thickness triangular flaps, pointing towards the center. 7. Fold one of the points towards the middle of the side which corresponds to it, going up as high as possible. We obtain a free triangular flap, of simple thickness. 8. Fold this small triangular flap into an accordion, making successive valley folds and mountain folds. One way to do this is to make these folds parallel to the hinge fold of the flap, each at a distance of 1/8th from the others. These folds can be prepared methodically. This succession of accordion folds will create a frieze of triangles alternately in one color then the other. 9. Repeat the operations of step 7 and step 8 on the other three flaps. 10. Choose one of the corners. Slide a finger of your right hand inside the corner, lifting the upper flap which carries the frieze of triangles. Grasp the corner between the thumb and index finger of the other hand, then pinch so that the two walls meet (of course removing the finger that is slipped inside!). Pinch well. 11. Repeat with the other three corners. As we progress, we feel the square bottom of the box taking shape. Furthermore, the points created in step 4 and step 5 stand up, and form a sort of base for the box. Once the four corners have been made three-dimensional and pinched, we obtain the Spanish box, with a square bottom but slightly curved edges, indented and carrying a frieze of triangles whose edges tend to rise very slightly. The result is very pretty ! If the paper is two-tone, the result will be even prettier, because the inside of the box will be a different color than the outside. |
| Contents | File |
| Spanish Box - PDF file | ML-Box09Ang.pdf |