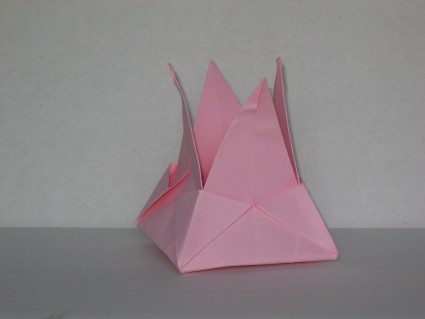

Candy Box
Candy Box
Welcome page
Back to the list

|

Candy Box |
|
Folding sheets Candy Box Welcome page Back to the list |
Aveuglami project - folding sheet
Candy Box
| Author | Traditional |
| Category | box |
| Difficulty | ** |
| Format | square, two-tone |
| Base | preliminary |
| Text | This folding forms a pretty box with long points, which only holds if it is filled with
candy.
1. Create a preliminary base. Hold the base tip closed at the bottom. 2. Locate the vertical diagonal, for example by bringing the left front flap vertical. Simply make a valley fold from left to right using the pre-existing fold. 3. Form a valley fold by bringing the upper right edge of the right front flap from right to left on the vertical diagonal. We can rely on the connection between the right front flap and the left front flap. 4. Return the left flap to its original position and bring its upper left edge along the vertical diagonal. It rests on the edge of the flap that we folded in the previous step. 5. Flip the fold from right to left. 6. Form a valley fold by bringing the upper right edge of the right front flap from right to left on the vertical diagonal. We can rely on the similar fold of the rear flap. 7. Form a valley fold by bringing the upper left edge of the left front flap from left to right on the vertical diagonal. We can rely on the similar fold of the rear flap. We now have a diamond shape, with a more tapered point towards the top. This point is composed of two triangular flaps having a vertical edge placed on the vertical diagonal of the diamond. This vertical edge is continued by a small horizontal edge, itself followed by a hinge edge which joins the upper point. 8. Form a 45¡ valley fold by bringing, from right to left, the lower horizontal edge of the left front triangular flap onto the hinge edge. Mark the fold well, unfold. 9. Form a 45¡ valley fold by bringing, from left to right, the lower horizontal edge of the right front triangular flap over the hinge edge. Mark the fold well, unfold. 10. The left front triangle forms a pocket that opens on the horizontal side. Open this pocket by spreading its two layers from right to left and pushing on the lower right corner. The triangle transforms into a diamond, one half of which extends beyond the initial diamond shape. Continue folding the overhanging part into the mountain, to slide it inside the fold, between the two left flaps. 12. Repeat the operation of step 11 on the right triangular flap. Open the pocket by spreading its two layers from left to right and pushing on the lower left corner. The triangle transforms into a diamond, one half of which extends beyond the initial diamond shape. Continue folding the overhanging part into the mountain, to slide it inside the fold, between the two left flaps. 13. Flip the fold from right to left. 14. Repeat the operations described in step 11 and step 12 by applying them to the two left and right triangular flaps. We have a diamond shape in a vertical position, with a more tapered point towards the top. The two middle corners of the diamond shape draw an imaginary horizontal line. 15. Fold the lower closed point upwards into a valley, leaning on the horizontal imaginary line which passes through the two middle corners. Unfold, fold up in the mountains, come back several times. 16. Slide your fingers inside the shape, gently spreading the edges. The bottom rises and gently settles into place. The large, tapered points snap into place in the form of almost triangular flaps that are curved outwards. We got a cute little box with four decorative flaps that appear to be coming out of it. If you use two-tone paper, these flaps are a different color than the background. |
| Contents | File |
| Candy Box - PDF file | ML-Box03Ang.pdf |