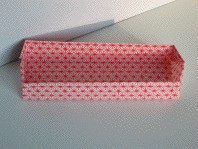

Elongated Box
Elongated Box
Welcome page
Back to the list

|

Elongated Box |
|
Folding sheets Elongated Box Welcome page Back to the list |
Aveuglami project - folding sheet
Elongated Box
| Author | van der Ploeg Elsje |
| Category | box |
| Difficulty | * |
| Format | square |
| Base | box-pleating |
| Text | This traditional model is described in a book made especially for blind people.
1. Take a square sheet of paper. If it is two-tone, place the color on top. 2. Create a valley fold by bringing the top edge over the bottom edge. We obtain a horizontal rectangular shape composed of two simple flaps linked by a horizontal hinge fold at the top. 3. Bring, through a valley fold, the lower edge of the upper flap onto the hinge fold. Mark the fold well. 4. Flip the folding from right to left. 5. Bring, through a valley fold, the lower edge of the upper flap onto the hinge fold. Mark the fold well. We obtain an accordion with a mountain hinge fold in the middle of two free flaps. 6. Lift the fold, open it from below and continue to pivot around the mountain hinge fold until the fold is completely closed. We obtain a rectangular shape composed of two rectangular flaps of double thickness, connected by an upper hinge fold. 7. Open the fold vertically, release the single vertical front flap, then create a valley fold by bringing the lower edge of the front flap to the upper edge of the rectangular shape. Attention ! we only fold the first thickness of the flap, leaving the second thickness to return to the horizontal without being folded. 8. Flip the fold from right to left. 9. Likewise, open the fold vertically, release the simple vertical front flap, then create a valley fold by bringing the lower edge of the front flap to the upper edge of the rectangular shape. Attention ! we only fold the first thickness of the flap, leaving the second thickness to return to the horizontal without being folded. We obtain an accordion comprising a first rectangular flap, then 4 rectangular flaps half the height of the first, and to finish again a rectangular flap of the same size as the first. 10. Flip the fold from right to left. We have a horizontal rectangular shape. In the middle of it, there is an extra horizontal rectangle. 11. Close the fold with a mountain fold, using the horizontal middle fold. The excess rectangle is divided into two rectangles located on either side of the hinge fold that we have just made. 12. Create a valley fold by bringing the lower left corner of the front rectangle to 45¡ over the upper hinge fold. Unfold, then transform the valley fold into a mountain fold to slide the corner under the excess thickness. 13. Repeat [step 12] with the lower right corner of the rectangle extra thick 14. Flip the fold from right to left. 15. Repeat the operation of [step 12] and [step 13] on the rectangle with extra thickness. 16. Open the fold from below and lay it flat. We obtain a rectangular shape with, in excess in the middle, a rectangle ending on the left and right by a triangular point formed on two sides at 45¡. 17. Locate the top and right vertices of the left point. Make a vertical valley fold passing through these two points. The crease runs across the entire rectangular shape. Unfold and refold several times. 18. Repeat [step 17] with the right tip. 19. Fold the upper single flap of the rectangular shape into a valley, resting on the upper horizontal edge of the extra-thickness shape. Mark the fold well. 20. Lift up the flap that you have just folded, and slide it under the extra thickness. 21. Bring the upper left corner of the rectangular shape onto the extra thickness shape, using the 45¡ fold of the extra thickness tip. Mark the fold well. 22. Raise the corner that has just been folded and slide it under the extra thickness point. 23. Repeat [step 21] and [step 22] with the upper right corner of the rectangular shape.bend 24. Start again from [step 19] to [step 23] with the lower flap of the original rectangular shape. We obtain a 6-sided shape, which looks like a horizontal rectangle ending on the right and left with a point whose sides are at 45¡. The front part will be the bottom of the box. 25. Flip the fold from right to left. We find the previous shape, but in the middle there is an opening. 26. Slide the thumb of the right hand into this opening, so as to open the fold. Gently push towards the bottom. The box begins to form. 27. With your left hand, gently push the left side towards the right to make the wall vertical. Pinch the three sides to clearly mark the folds. 28. Shape the right side in the same way. We obtain an elongated box, rectangular in shape. |
| Contents | File |
| Elongated Box - PDF file | ML-Box01Ang.pdf |