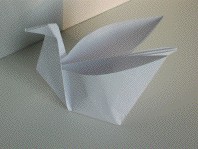

Swan 2
Swan 2
Welcome page
Back to the list

|

Swan 2 |
|
Folding sheets Swan 2 Welcome page Back to the list |
Aveuglami project - folding sheet
Swan 2
| Author | Traditional |
| Category | bird |
| Difficulty | ** |
| Format | square |
| Base | fish |
| Text | This swan has wings capable of carrying small gifts. It's not a stork after all!
1. Start with a base of the fish. Orient it vertically, with the long, sharp point facing down. 2. Form a valley fold by bringing, from bottom to top, the lower tip of the front flap over the blunt tip. Mark the fold. 3. Close the fold with a valley fold from right to left, leaning on the central axis of the shape. We obtain a triangle with a long vertical edge on the right and a vertex on the left. 4. Rotate the folding 90° to the left. The triangle now has a long horizontal upper edge, a very sharp point on the right and a less sharp point on the left. The top is at the bottom. Creation of the neck 5. Take the very sharp point between the thumb and index finger of the right hand, then gently slide them along the lower edge of the triangle, going towards the left. At a given moment, we feel a change in thickness: it becomes significantly greater. Locate this point. If we follow the path of this new thickness upwards, we draw an imaginary vertical straight line, perpendicular to the long horizontal edge. It will serve as a reference for the fold of step 6. 6. Form a vertical valley fold aligned with the line described in step 5 by folding, from right to left, the right vertex. Do not mark the fold. 7. Using the bottom of the imaginary line marked in step 5 as the pivot axis, tilt the left tip of the front flap to the right. Start by bringing the lower edge of the moving tip along the imaginary line marked in the previous step, without marking the fold that is emerging. The moving edge is then perpendicular to the long horizontal edge. Bring the moving edge slightly to the left, so that it leans slightly toward the back of the shape. Mark the fold well. Unfold. We just made a pivot fold. 8. Open the fold by sliding a finger in, place the left thumb at the height of the junction point of the displaced edge and the long horizontal edge, pull back with the index finger until the preparation folds become folds valley. Close the fold and mark the folds. We made an exterior reverse fold using the pivot fold that we just made. Creation of the head. 9. Form a valley fold by bringing the top of the point to the right, so that the tilting side is almost horizontal. Mark the fold well. Unfold. There is no reference, it’s a question of proportion to give the appearance of a swan… or something else! 10. Transform the top of the point into an outer reverse fold, with the same technique as in step 8. The shape obtained has a neck thrown backwards on the right and a beak turned towards the right, as well as three flaps at the back. Finishing 11. Slide a finger into each of the exterior flaps (the wings) to open and round them. The interior flap remains fixed, it is the tail. |
| Contents | File |
| Swan 2 - PDF file | ML-Bird03Ang.pdf |