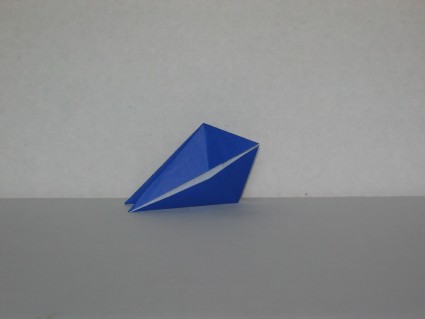

Fish Base
Fish Base
Welcome page
Back to the list

|

Fish Base |
|
Folding sheets Fish Base Welcome page Back to the list |
Aveuglami project - folding sheet
Base
| Author | Traditional |
| Category | Base |
| Difficulty | * |
| Format | square, two colors |
| Base | Fish |
| Text | This base, a logical continuation of the diamond base, allows us to create some very simple models. 1. Take a square sheet, hold it in the “point up” position. If it is two-tone, place the main color underneath. 2. Form a valley fold by bringing the middle left corner from left to right over the middle right corner. Unfold. Watch carefully the folds at the two upper and lower points. Before unfolding, we obtain a triangular shape with a vertical hinge fold on the left which connects two triangular flaps whose vertices are on the right. After unfolding, the diagonal is marked by a valley fold. 3. Flip the sheet from right to left. 4. Turn the sheet so that the mountain fold is horizontal. 5. Form a valley fold by bringing the middle left corner over the middle right corner from left to right. Watch carefully the folds at the two upper and lower points. We obtain a triangular shape with a vertical hinge fold on the left which connects two triangular flaps whose vertices are on the right. 6. Form an oblique valley fold by bringing, from top to bottom, the middle right corner of the front flap to the hinge edge, while adjusting the upper right side of the front flap all along this edge. The fold should start at the top apex of the hinge fold. Carefully monitor its formation, particularly the very fine tip. 7. Flip the fold from right to left. 8. Form an oblique valley fold by bringing, from top to bottom, the middle left corner of the front flap to the hinge edge, while adjusting the upper left side of the front flap all along this edge. The fold should start at the top apex of the hinge fold. Carefully monitor its formation, particularly the very fine tip. 9. Unfold the front and rear flaps to return to the triangular shape of step 5. The hinge edge should be in a vertical position, on the left. The upper summit is the starting point of the valley folds that we have just made. The lower point is free of folds. We are going to apply the operations that we have just done to it. 10. Rotate the fold 180°, the upper tip becoming the lower tip. 11. Form an oblique valley fold by bringing, from top to bottom, the middle right corner of the front flap to the edge, while adjusting the upper right side of the front flap all along this edge. The fold should start at the top apex of the hinge fold. Monitor your training carefully. 12. Flip the fold from right to left. 13. Form an oblique valley fold by bringing, from top to bottom, the middle left corner of the front flap to the hinge edge, while adjusting the upper left side of the front flap all along this edge. The fold should start at the top apex of the hinge fold. Monitor your training carefully. 14. Unfold the front and rear flaps to return to the triangular shape of step 5. The hinge edge should be in a vertical position, on the left. 15. Bring the right and left edges of the triangle simultaneously from right to left towards the hinge edge using the valley folds starting from the top and bottom vertices. The middle right vertex transforms into a point which is pinched so as to bring it vertically, as the two edges approach the hinge fold. When both edges are aligned with the hinge edge, the tip is perpendicular to the plane of the fold (to the table). 16. Pinch the tip of the flap to mark it well. Tilt it upwards, so as to flatten it. This type of fold, which refines a triangle, is called a rabbit ear. 17. Flip the fold from right to left. We obtain a triangular shape with a point on the left, corresponding to the rear flap of step 5. The previous folds are hidden by this triangle. 18. Bring the right and left edges of the triangle simultaneously from right to left towards the hinge edge using the valley folds starting from the top and bottom vertices. The middle right vertex transforms into a point which is pinched so as to bring it vertically, as the two edges approach the hinge fold. When both edges are aligned with the hinge edge, the tip is perpendicular to the plane of the fold (to the table). 19. Pinch the tip of the flap to mark it well. Tilt it upwards, so as to flatten it. 20. Open the folding with a movement from left to right applied to the lower flap. We obtain a very elongated diamond shape, with a sharp point upwards, and equipped, in the middle, with two triangular flaps. This is the intermediate version of the fish base. 21. Flip the fold. 22. Form a valley fold by bringing the upper peak of the front flap over the lower tip from top to bottom. You have in your hands the final version of the fish base. It is a kite, equipped at the bottom with a long point made up of two triangular flaps connected by an internal hinge fold. The upper part is a triangular shape built around two independent symmetrical triangles. |
| Contents | File |
| Fish Base - PDF file | ML-Base09Ang.pdf |