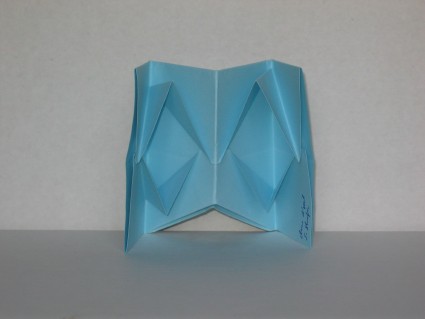

Blink Eyes
Blink Eyes
Welcome page
Back to the list

|

Blink Eyes |
|
Folding sheets Blink Eyes Welcome page Back to the list |
Aveuglami project - folding sheet
Blink Eyes
| Author | unknown |
| Category | animated |
| Difficulty | ** |
| Format | square, two-tone |
| Base | other |
| Text | A nice model that can come in multiple variations. 1. Hold the sheet in the vertical edges position, with the white color on it. 2. Create a valley fold by bringing the right edge to the left edge from right to left. Unfold. 3. Flip the fold from right to left. 4. Create a valley fold by bringing the top edge up to the bottom edge. We obtain a horizontal rectangular shape, made up of two single-thickness flaps linked by an upper hinge fold. 5. Bring the bottom edge of the top flap over the hinge fold. We obtain a flap of double thickness which partially covers the lower flap of the first step. 6. Reassemble the flap that you have just folded. Return the fold. We obtain a rectangular shape composed of a lower flap covered in its upper part by another smaller flap. The two flaps are linked by a hinged upper edge. 7. Bring the lower edge of the lower flap, through a valley fold from bottom to top, without marking the fold, in contact with the lower edge of the upper flap. This lower edge then follows the same horizontal direction as the lower edge of the upper flap. 8. Without losing the horizontality of the edge that is being moved, bring it slightly above the lower edge of the upper flap, so as to cover it by one or two millimeters. Mark the fold. We now have three flaps: a lower flap, linked to two flaps by an upper hinge fold and a lower hinge fold. The lower flap slightly overlaps the upper flap. 9. Slide the part of the lower flap that covers it under the upper flap. We now have a horizontal rectangular shape. 10. Make a mountain fold along the right edge, a few millimeters from the edge. 11. Repeat the operation with a second mountain fold resting on the first. We rolled the right edge to close it. 12. Make a mountain fold along the left edge, a few millimeters from the edge. 13. Repeat the operation with a second mountain fold resting on the first. We rolled the left edge to close it. 14. Fold the upper right corner into a 45¡ valley, leaning on the lower edge of the upper flap. Unfold. 15. Do the same operation on the upper left corner. 16. Fold the right edge over the left edge like a mountain. We obtain a vertical rectangular shape with two flaps of thickness 2. A hinge fold located on the left connects them. 17. Fold the upper left corner through all the thicknesses into a 45¡ valley, resting on the lower edge of the upper flap. Unfold. 18. Fold the right edge of the upper flap into a valley on the hinge fold on the left. Mark well. Unfold. 19. Flip the fold from right to left. 20. Fold the left edge of the upper flap into a valley on the hinge fold on the right. Mark well. Unfold. We now have a horizontal rectangular shape comprising a bottom flap to which are connected an upper front flap with an upper hinge edge, a lower front flap with a lower hinge edge. The upper front flap slightly overlaps the lower front flap. Two well-marked vertical valley folds exist, one in the right part of the rectangle, the other in the left part. 21. Gently fold the left valley fold, by sliding a finger under the upper flap at the height of the valley fold being treated. You must transform the valley fold which is on the upper front flap into a mountain fold. The operation is based on two 45¡ folds which begin on either side of the start of the valley fold to be transformed. While gently closing the valley fold of the lower flap, we help the upper front flap to close by forming a point which advances towards the folder. Open and close the valley fold several times so that the point forms well. 22. Carry out the operation of step 21 on the right valley fold. 23. Fold the rectangle like an accordion, relying on the two valley folds that we have just treated and the mountain fold located in the middle of the rectangle. We thus have a small accordion made up of four folds. If we gently open the accordion by pulling on the two exterior flaps, the two points that we constructed in the previous steps seem to materialize in 3 dimensions. They show the inside of the fold, namely the white color if you use two-tone paper. As the flaps are opened, the two points join the horizontal plane, and the white part disappears. To complete the folding, we will construct two other points from the lower front flaps. 24. Half open the left valley fold. The upper tip extends forward, providing access to the upper edge of the lower front flap. 25. Slide a finger under this edge, so as to peel it off under the upper point. Begin to form a lower point by transforming the valley fold into a mountain fold. 45¡ folds form on either side of the new mountain fold. Gently close the valley fold so that the lower point forms well. Open and close several times. 26. Repeat the operation of step 25 on the right valley fold. We now have a folding system that gives the impression of blinking when we open and close the exterior flaps. |
| Contents | File |
| Blink Eyes - PDF file | ML-Animated01Ang.pdf |