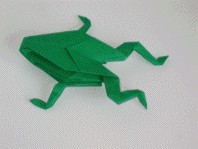

Frog
Frog
Welcome page
Back to the list

|

Frog |
|
Folding sheets Frog Welcome page Back to the list |
Aveuglami project - folding sheet
Frequently
| Author | Traditional |
| Category | Animal |
| Difficulty | *** |
| Format | square |
| Base | Frog |
| Text | This is the traditional frog model. It has the advantage of being quite simple, once you have mastered the base of the frog and the reverse fold technique! 1. Start at the base of the frog. Arrange it so that the single point is upwards, as well as the short points in the middle of the shape. Normally, the different flaps are arranged symmetrically, the front face having a short point. 2. Raise the left front flap vertically to locate the central axis. 3. Create a valley fold by bringing the lower right side of the upper right flap along the centerline. Mark the fold well. 4. Bring the left flap flat, if you have not already done so. Bring the bottom left edge of the top left flap along the center line. We obtain a very elongated diamond shape with extra thickness, with a free point at the bottom. 5. Flip the fold from left to right. 6. Apply the treatments from steps 2 to 4 to the two front flaps. 7. Rotate the right front flap from right to left, along the vertical middle crease. 8. Return the fold. 9. Rotate the right front flap from right to left, along the vertical middle crease. 10. Apply the treatments from steps 2 to 6 to both front and rear flaps. We obtain an elongated shape, with a single point at the top and four thick points at the bottom. 11. Open the lower left front tip slightly and invert it as high as possible inside itself. Mark the folds well. 12. Open the lower right front tip slightly and invert it as high as possible inside itself. Mark the folds well. This will be the left front leg. 13. Open the lower left rear tip slightly and turn it inside itself, bringing its upper edge horizontal. Mark the folds well. This will be the right front leg. 14. Open the lower left rear point slightly and turn it inside itself, bringing its upper edge horizontal. Mark the folds well. This will be the left hind leg. 15. slightly open the lower right rear tip and turn it inside itself, bringing its upper edge horizontal. Mark the folds well. This will be the right hind leg. We obtain a shape which has, towards the top, two almost vertical fine points framing a large, fairly thick point, and towards the bottom two fine points located on either side of a fairly thick volume. 16. Locate the point where the left outer point meets the large middle point. 17. Turn the outer tip downwards, inside itself, at the height of the point previously marked. The bottom edge of the reverse fold must be horizontal. 18. Locate the middle of the bottom edge of this fold. Invert it once again with the tip upwards, moving it slightly away from the vertical, towards the left. 19. Repeat the previous treatment by applying it to the upper right tip. To do this, locate the point where the right outer point meets the large middle point. 20. Turn the outer tip downwards, inside itself, at the height of the point previously marked. The bottom edge of the reverse fold must be horizontal. 21. Locate the middle of the bottom edge of this fold. Invert it once again with the tip upwards, moving it slightly away from the vertical, to the right. This position does not need to be symmetrical to that of the upper left tip. 22. Locate, on the upper edge of the lower left point, a point a little far from the intersection with the body of the fold. 23. Reverse, inside itself, the lower left point around the point marked previously. The inverted point must be placed slightly away from the vertical, offset to the left. 24. Locate a point towards the bottom of the tip that has just been knocked over. There is no real benchmark. Flip the tip around this point again, inside itself, to the left, so that it points slightly downward. 25. Repeat the treatment of steps 22 to 24 by applying it to the lower right tip. To do this, locate, on the upper edge of the lower right point, a point a little far from the intersection with the body of the fold. 26. Reverse, inside itself, the lower right point around the point marked previously. The inverted point must be placed slightly away from the vertical, shifted to the right. 27. Locate a point towards the bottom of the tip that has just been knocked over. There is no real benchmark. Flip the tip around this point again, inside itself, to the right, so that it points slightly downward. 28. Hold the fold by the body, loosely, at the height of the upper points, the thick point moving away from you. You should have a small opening in front of you at the base of the body of the fold. 29. Blow gently then a little harder inside the fold, until it is well inflated. |
| Contents | File |
| Frog - PDF file | ML-Animal02Ang.pdf |